Saturday, August 30, 2008

General Sibling Selector

The combinator for this selector is the tilde character (~). The General Sibling Selector targets an element that is a sibling of another element - that is, they have the same parent. However, in the General Sibling Selector, the first selector must appear before the second selector in the (X)HTML document.
Example: p ~ ol {border: solid 1px black;}
The General Sibling Selector is ignored by IE6

Friday, August 29, 2008

Adjacent Sibling Selector

The meaning of sibling in general language is brother or sister. In (X)HTML it means any elements that are in the same level in the document tree. In other words, sibling elements are those that have a common parent; they are contained in the same element. Adjacent sibling elements are those that are next to each other and are contained in the same element.
An adjacent sibling selector selects a sibling element that comes immediately after a particular element. The combinator of the adjacent sibling selector is the plus sign + . Remember, the element that is first in the (X)HTML document must also appear first in the selector.
Example: h1 + p {background-color:green;}
Note: The Adjacent Sibling selector is not supported by IE6 (it is ignored).

Child Selector

Using the > combinator between two selectors, you can target child elements only. Example: div > p
The above selector targets only those p elements that are children of div elements. Grand children, great grand children etc. won't be targetted.
Note: IE6 does not support child selectors (it ignores them)

Descendant Selectors

Using a descendant selector you can target only descendants of a particular element. Remember, descendants include both direct descendants (child elements) and all indirect descendants. Example: #main p
The space that separated the two selectors is called a combinator. There can be more than one descendant selector: ul li img
The descendant selector is an example of a contextual selector

Thursday, August 28, 2008

(X)HTML Hierarchy - The Document Tree

All the (X)HTML elements in a document can be represented as a tree structure. The root element is html, within this are the two elements head and body and so on. Here is an example of an HTML document structure:

An element is the parent of another element if it directly contains that element. For example, in the document tree shown, head is the parent of meta. Similarly, an element is the child of another element if is directly contained in that element. For example, in the document tree shown here, head is the child of html.
An ancestor element of an element is one that contains it - indirectly or directly . In the diagram, one of the span element's ancestor elements is div - the span is contained in a p element which is, in turn, contained in the div element.
Similarly, a descendant element of an element is one that is contained in it indirectly or directly. For example, in the document tree shown, h2 is a descendant element of body.
A child is also a descendent and a parent is also an ancestor.

Wednesday, August 27, 2008

Attribute Selectors

Attribute selectors can be used to select (X)HTML elements based on their attributes and the value of their attributes. An attribute selector is made by enclosing the name of the attribute in square brackets - [ and ]. Example:
To select the following element - <img src="image.gif" alt="product" /> , you can use the following selector - [alt]. This would select any element in the document with the img attribute. To only select img elements that have the alt attribute, you would use the element name with the attribute selector - img[alt] .
You can also specify the exact attribute value - img[alt="button"]. Some attribute values have spaces in them. Such attributes can be selected by their partial attribute value. For example, the following XHTML element - <img src="images/rose.gif" alt="picture of the rose in sunlight" /> can be selected using the following CSS selector - [alt~="rose"] .
The |= operator (the "pipe" character) is used to select elements with an attribute whose value is a hyphenated string beginning with a particular string of text. Example: [src|="image"] will select the following elements <img src="image-1.gif" alt="a rose"> <img src="image-2.gif" alt="a tulip">

CSS3 Attribute Selectors

Using the ^= operator, you can select elements whose attribute values begin with a particular string of text. Example: a[href^="ftp:"] will match all links that refer to FTP sites.
The $= operator will match all elements with a particular attibute whose value ends with a particular string of text. Example: img[src$="gif"] .
The *= operator will match an elements with a particular attribute whose value contains a particular string. Example: img[alt*="rose"] will match <img src="image.jpg" alt="picture of a rose in a vase"> IE6 does not support Attribute Selectors. IE7 does not support stand-alone Attribute Selectors - example: [alt] will not work in IE7 but img[alt] will.

Class and ID Selectors

Class Selectors

To use a class selector in CSS, you must use the class attribute in your HTML. Here is an example: <p class="last_para"> . The class selector is simply the name of the class prefixed with a period (.). The class selector of the example above is .last_para . Here is a CSS rule that uses a class selector:
.last_para {background-color: gray;}
If you include an element type selector before the Class selector, then only those elements which are also in the class will be targeted.
Example: p.last_para {background-color: gray;}
The above code will only target those p elements that are in the last_para class.
In (X)HTML, the class attribute can have more than one value - that is, an element can be in more than one class. To do this, the class names are entered as a space-separated value.
Example: <div class="main first observation">
A class selector can target an element that is in more than one class - each class name is prefixed with a period and they appear one after the other with no spaces between them. Example: .first.observation {font-color:red;}
Note: the order that the class names appear in the (X)HTML class attribute value or in the CSS selector is not important.

ID Selectors

To use an ID selector in CSS, you must use the id attribute in your HTML. Here is an example: <div id="nav_bar"> . The ID selector is just the name of the ID prefixed with the pound symbol (#). The ID selector in the above example is #nav_bar . Here is a CSS rule that uses an ID selector:
#nav_bar {float:right;}
If an element type selector is followed by an ID selector, then, only the specified (X)HTML selector that has the specified ID will be targeted. But this is not really necessary because an ID has to be unique in an (X)HTML document - only one element in an (X)HTML document can have a particular ID. It is of no use for an element to have more than one ID because there cannot be more than one instance of an ID in an (X)HTML document.
Example: div#nav_bar {float:right;}
The above code targets a div that has the nav_bar ID.

Note that class and ID names are case-sensitive in both (X)HTML and CSS.

Selector Grouping

Selectors can be grouped by separating selectors with commas, a single declaration block can apply to multiple selectors.
Example: p, div {background:#000000;} .

The asterisk (*) is called the universal selector. The universal selector matches all the elements of a document.

Tuesday, August 26, 2008

CSS Rule Structure

Here is an example of a CSS rule:
h1, p {color:#000000;background:#ffffff}
A CSS rule consists of two parts - the selector and the declaration block. The selector comes first and can be any (X)HTML tag, a class, an id, a pseudo-class, a pseudo-element, the universal selector, or an attribute selector . There can be more than one selector - there are various ways in which selectors can be used together.
Next comes the declaration block which starts with the left brace { and ends with the right brace }. The declaration block contains one or more declarations. A declaration consists of a property followed by a colon which is followed by a value. If there are no more declarations following a particular declaration, then it should end with a semi-colon. The last declaration is followed by the right brace; the semi-colon is optional.
A property is a word that refers to a formatting effect. For example color is a property.
A value describes the formatting that has to be applied to the selector. The value can be a color value, a number value, a length value, a percentage value or a URL.
Note that spaces,tab characters,carriage returns, line feeds and form feeds are considered whitespace and are ignored anywhere except within selectors, properties and values.

Element Type Selector

The most basic CSS selector is the Element Type Selector. Any HTML tag name is an Element Type selector. An Element Type selector indicates the HTML tag to which the CSS declarations should be applied.
Example: p {color:red}
In the above example, the selector is p and the CSS declaration that will be applied to it is color:red .

CSS Comments

You can insert a comment in CSS by enclosing the comment text like this /* this is your comment */. You can even have CSS comments in inline styles - <h1 style="color:blue;/* a comment */">
Note that comments cannot be nested.

Alternate Style Sheets

Alternate style sheets are those that can be selected manually by the user instead of the default style sheet. Currently, Firefox and Opera are the only major browsers that support Alternate Style Sheets.
Alternate style sheets are loaded using the <link> tag, with the attribute-value pair rel="alternate stylesheet". The title attribute is used to give the alternate style sheet a name. The user can then manually choose the style sheet by selecting the style sheet by name in the browser.
Here is an example of the code that loads an alternate style sheet:
<link rel="alternate stylesheet" href="styles.css" type="text/css" title="serif font" />
In Firefox, this style sheet can be selected by going to View > Page Style > serif font . Different alternate style sheets can be specified for different media by having more than one link element with the same value for the title attribute but different values for the media attribute.
Example:
<link rel="alternate stylesheet" href="style.css" title="serif font" media="screen" />
<link rel="alternate stylesheet" href="compactstyle.css" title="serif font" media="handheld" />
Note that all the style sheets referenced by the link tag are downloaded by the browser when the page is displayed even though all of them may not be used. This can add significant latency to the display of the page.

Friday, August 15, 2008

Specifying media: Internal and External Stylesheets

You can specify different style sheets for different display devices (called media). For internal style sheets that are loaded using the <link> element, you can specify the media using the media attribute. To specify more than one media, separate them with commas. For example:
<link rel="stylesheet" type="text/css" href="styles.css" media="screen, print" />
For internal style sheets that are loaded using the <style> element and the @import directive, you can specify the media as below:
<style type="text/css">
@import url(styles.css) screen, projection;
</style>

different media

all
applies to all media
aural
for speech synthesizers and screen readers
braille
for Braille devices
embossed
for Braille printers
handheld
for handheld devices like PDA's and mobile phones
print
used when printing the web page
projection
used with projectors
screen
use with computer screen
tty
used with media with a fixed-pitch character grid
tv
used by televisions

External Style Sheets - <link>, <style> and @import

An external style sheet is a text file containing CSS rules - it does not contain any HTML. It has the file extension .css.
There are two ways of linking an external style sheet - using the <link> element and the other way is using the <style> element and the @import directive.

The link tag

Example:
<link rel="stylesheet" type="text/css" href="styles/sheet1.css" media="all" />
The above code is used to link a style sheet called sheet1.css to the current HTML document using the href attribute. This attribute's value is a URL of the style sheet file. Also, the style sheet applies to any media that the document is being viewed in (the media="all" attribute-value pair). The two other attribute-value pairs (rel="stylesheet" and type="text/css") must be included. You can also include the title attribute. Firefox displays the name of the style sheet in the View > Page Style menu, Opera in the View > Style menu. If you have more than one stylesheet with a title attribute, Firefox and Opera allow the user to choose which one should be applied by selecting it from the View menu.

The <style> tag and the @import directive

The <style type="text/css"> element contains CSS rules. The @import directive is a CSS statement that loads an external style sheet. This directive must be placed before any other CSS rules. The media to which the style sheet must be applied can be specified as a comma separated list.
Example: <style type="text/css">
@import url(styles/sheet1.css) screen, print;
p {font:62.5%}
</style>

Internal Style Sheets - the <style> tag

Internal style sheets are contained within the HTML document itself. The CSS rules are contained within the <style> element. The <style> element is itself contained in the <head> element.
Example:
<style type="text/css">
p
{
font-size: 1.6em;
}
</style>

This kind of style sheet is also called embedded style sheet or document style sheet.

Disadvantages of Internal Style Sheets

  • The style sheet code has to be repeated in every page of a web site - which is a hassle and adds to the size of every web page
  • Modification of the CSS is tedious because every page of the web site will have to be updated

Advantages of Internal Style Sheets

  • The browser does not have to download a separate file containing the style sheet - this reduces latency when rendering the web page

Thursday, August 14, 2008

Block-level and Inline-level elements

A block-level element creates a box that fills the parent element's width and does not allow other elements on either side.
Examples of block-level elements are p, div, blockquote etc.

An inline-level element is always contained in block-level elements. An inline-level element generates a box within a line of text. When the element box reaches the right margin, it breaks and continues from the left of the next line.

Replaced and Non-replaced Elements

A non-replaced element is one whose contents are displayed by the browser.
Example: <p>This is a paragraph.</p>
The browser will display the content of the element which is This is a paragraph. When a browser renders a replaced element it displays something other than the content of the element. The element can be empty (example: img, input,textarea, object ) or it can have content such as iframe.

Advantages of CSS over Presentational Markup

Web pages can be styled using presentational markup (HTML) or CSS (Cascading Style Sheets). Styling using presentational markup is "old school" and has a number of disadvantages. CSS is, technically, the "right" way of styling web pages because (X)HTML is a structural markup language.
Disadvantages of presentational markup:
  • Leads to large, bloated web pages
  • Makes the code of the web page extremely complex
  • Each element has to be styled individually
  • The rendering of the web page is slow
  • Lack of flexibility - once done, no easy way of changing the design
  • Poor accessibility - makes the page less accessible to the blind
  • Results in low search engine rankings
Advantages of CSS
  • Web pages contain only structural markup, therefore small and fast to load
  • Keeps the code of the web page simple
  • A single element can be styled using a single CSS rule no matter how many times they occur
  • Page is rendered quickly
  • Design can be easily changed later
  • Page is accessible to disabled people
  • Results in higher search engine rankings

Wednesday, August 13, 2008

Ordered Lists - The <ol> tag

The ol tag is used to create a list when the sequence of the items are important. The browser numbers each item of the ordered list sequentially.
Each item of the ordered list must be enclosed in the li element. The ol element must not be inside a p element. It can be within the body element, the blockquote element or the div element.
All browsers indent the list from the left.
Ordered and unordered lists can be nested within each other. The li element can contain another ordered or unordered list. Actually, the li tag can contain virtually any element that the body element can contain.
Example:
<ol>
<li>Super item</a>
<ul class="sub">
<li><a href="sub1.html">Sub-item 1</a></li>
<li><a href="sub2.html">Sub-item 2</a></li>
<li><a href="sub3.htm">Sub-item 3</a></li>
</ul>
</li>
<li>Item 2
<ol>
<li>Sub-item1</li>
<li>Sub-item 2</li>
<li>Sub-item 3</li>
</ol>
</li>
<li>
<table border="border"><tr><td>row1item1</td><td>row1Item2</td></tr><tr><td>row2Item1</td><td>row2item2</td></tr></table>
</li>
</ol>

This is rendered by all major browsers like this:

Unordered Lists - the <ul> tag

An unordered list is one which is not numbered. This implies that the order of the items in the list is not important. Ordered lists are also useful in navigation bars - they are used to present a collection of site-navigation links.
The ul element contains the items of an unordered list. The ul tag is a block element that cannot be contained within p elements. It can, however, be contained in blockquote and div elements. Each item of the list is contained in li tags. The ul tag can only contain li tags - no other content is allowed.
All major browsers render unordered lists as bulleted lists. Bullets are, by default, small solid discs that are displayed to the left of each item in the list. All major browsers indent the bullets from the left. The exact amount of indentation is not specified by any standard.
Example: <ul>
<li>Item 1</li>
<li>Item 2</li>
<li>Item 3</li>
</ul>

This is rendered in Firefox 3 as below:

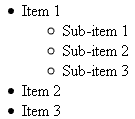
Note that unordered lists can be nested. Thus, you can have sub-items in a list. The following example shows an unordered list where the first item, "Item 1", has three sub-items. We first enter the name of the sub-list in the li element. This is then followed by the ul tag and the rest of the code of the sub-list.
Example:
<ul>
<li>Item 1
<ul>
<li>Sub-item 1</li>
<li>Sub-item 2</li>
<li>Sub-item 3</li>
</ul>
</li>
<li>Item 2</li>
<li>Item 3</li>
</ul>
The <sub> tag and the <sup> tag

The sub tag causes the enclosed text to be rendered as a subscript. The text is lowered by half a character's height, in the same font size as the surrounding text.
The sup tag renders the enclosed text as a superscript. The text is raised by half a character's height, in the same font size as the surrounding text.

Monday, August 11, 2008

The <link> element

The link element is contained in the head element. The purpose of this element is to define the relationship between the current document and another document. link is an empty element.
With the link tag, you can specify the relationships between the documents of a document set.
The href attribute's value is the URL of the target. This is a required attribute. The rel attribute specifies the relationship from the current document to the target document. The rev attribute specifies the reverse: the relationship from the target document to the current document.
The relationship can be specified by the values next or prev indicating next or previous.
The title attribute specifies the name of the target document.
The type attribute specifies the MIME type of the target document.
Example: <link rel="stylesheet" href="alltags.css" type="text/css" />
Browsers do not do anything with the link tag. However, this tag can be used by you to organize a web site. It can also be useful when using server-side scripting to generate pages.

The <q> tag

The q tag is used for enclosing short quotes. All major browsers, except Internet Explorer, render quote text within inverted commas.
The cite attribute lets you indicate a URL as the source of the quote.

The <pre> tag

All the text inside a pre element is rendered exactly as it is in the HTML document, ignoring normal HTML whitespace and line wrapping rules. The text is rendered in monospace font. Use this tag when you want the text to appear exactly the way it was entered in the document, or when you want the columns and rows of characters to always lineup in a particular way. Tab stops are defined at every eighth character position but using tabs is unreliable. Therefore, it is better to use spaces to lineup characters.
The pre element can contain any inline elements but not block-level elements. All special characters must be substituted with entity equivalents (example: < , > etc.).

Sunday, August 10, 2008

The <samp> tag

This tag is used to indicate that the enclosed tag is a "sample" and therefore has to be understood literally and not in the context that it is found.
Example: <p>There are many inline content tags like <samp>kbd</samp>.</p>
All major browsers render the sample element in a monospace font.

The <kbd> and the <var> tag

The <kbd> tag
This is used to indicate text that is typed on the keyboard. Most browsers render the enclosed text in monospace font.
Example: <p>Enter the following text at the command prompt: <kbd>ping -n 1 -l 0 www.yourserver.com</kbd></p>
The <var> tag
This is used to indicate a variable. This element can be nested in the code element. The enclosed text is rendered in italics.

Friday, August 8, 2008

The <acronym> tag

acronym with a tooltip

The acronym element is a phrase element. This means that it is an inline element that adds semantic information to strings of text.

This tag is used to indicate that the enclosed text is an acronym. An acronym is a word made up of the the initial letters of a phrase - for example, HTML.

Just like the abbr element, Firefox and Opera render the acronym with a dotted underline, IE7 and Safari render them normally.

The title attribute is useful here because it can contain the expanded form of the acronym. This expanded form will then be displayed when the user hovers the mouse over the acronym.

Example: <acronym title="internet service provider">ISP</acronym>

The <abbr> tag

The abbr element is a phrase element. This means that it is an inline element that adds semantic information to strings of text.

This tag is used to indicate that the enclosed text is an abbreviation. Firefox and Opera render the abbreviation text with a dotted underline, but IE7 and Safari don't.

Note: An abbreviation is a shortened form of a word or phrase. Whereas an acronym is a word formed of the first letters of a phrase. Example: OPEC

title attribute

The title attribute can contain the expanded form of the abbreviation.

Example: <abbr title="modulator-demodulator">modem</abbr>

When the mouse hovers over the abbreviation, the browser displays the expanded form as a tool-tip.

Thursday, August 7, 2008

The <p> tag

The p element is used to contain a paragraph of inline content such as text or images. The p element can be contained in the body element, in lists (li elements), in form elements and certain other block-level elements.

Tuesday, August 5, 2008

The <title> tag

This is an element that is compulsory in XHTML documents. It is a contained in the head element.
The text inside the title element is considered the title of the document. It is displayed in the title bar of the browser. This element can contain only text.
Example: <title>The Page Name</title>

Sunday, August 3, 2008

Comments in HTML Code

You can insert comments in HTML as follows: <!-- comment text -->
Comments can be nested inside elements.
<h1><!-- This is a comment -->This is an h1 tag</h1>
Comments cannot be inserted within tags.